

Brain Tutor 3D for Android
Overview
Brain Tutor 3D for Android is fun to use and it is easy to figure out how it works - just have a look at the video on top of this page. Note that the video was recorded while using real hardware (Nexus 7 2013), i.e. it reflects the native speed of the app. The transparent white disks in the video above indicate user interactions with one (1 disk) or two (2 disks) fingers.While the app is very intuitive to use, the following instructions help you to get the most out of Brain Tutor on your Android device. If you have any further questions or suggestions, please send an email to goebel [at] brainvoyager [dot] com. After launching the app the first time on a tablet, Brain Tutor 3D automatically selects an atlas ("Gyri"). You can immediately tap on the brain model to select and learn about specific brain regions.
Brain Tutor runs on both phones and tablets. On phones, navigation lists with brain atlases and brain areas as well as the brain view are shown in the same screen space, i.e. all these views (atlas -> area -> brain) are stacked on top of each other in a single pane and one needs to navigate forward and backward to switch between different types of information. Tapping on a table item navigates forward while tapping the left pointing button in the top bar or the standard system Back button navigates backwards. On tablets (7 inch screen or larger) that are hold in landscape orientation, the program adjusts its layout by dividing the screen space into two main parts. The pane on the left shows the atlas and brain region lists while the right side always shows the brain view. If a tablet is hold in portrait mode, the left pane with the atlas/areas lists is not shown. You can, however, tap on brain meshes to select different areas. A tap on the displayed name of a selected brain structure will show a popup dialog with relevant text information.
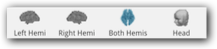
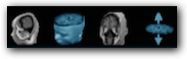
Brain Tutor HD visualizes brain areas on five brain models that can be selected using the tab bar at the bottom of the 3D brain visualization view. Three models are cortex representations of the left ("Left Hemi" icon), right ("Right Hemi" icon) as well as both hemispheres ("Both Hemis" icon). A special brain model for subcortical structures is shown when the "Subcortical" atlas is selected in the "Atlas Type" table. The fifth model is always available showing the head (skin surface) of the subjects measured in the MRI scanner ("Head" icon). Tap on the available icons to switch between different brain views.
The brain views allow to visualize selected brain structures of the currently selected atlas. The head model provides a complementary visualization showing brain structures on three orthographic high-resolution MRI planes ("slices"). This dual representation helps to relate 2D and 3D representations of the same structures.
Selecting a Brain Atlas
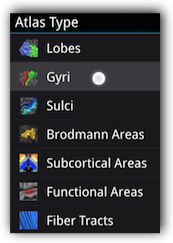
Select an item in the atlas table ("Atlas Type") in order to switch between different brain atlases. Select the "Lobes" atlas to explore the major lobes of the brain. Select the "Gyri" atlas to explore the location and names of the major gyri. Likewise, you can explore the sulci by selecting the "Sulci" atlas. Select the "Brodmann Areas" atlas to learn about the approximate location of Brodmann areas; note that these areas are often used in functional brain imaging to roughly specify where in the brain an activation foci has been observed. Select the "Subcortical Areas" atlas to learn about major subcortical structures; when selecting this atlas, a special 3D brain model with these structures will be shown. Select the "Functional Areas" atlas to lean about important functional areas. Note that the incorporated specialized areas in this atlas were identified by a series of functional MRI scans of the subject visualized in the program. Select the "Fiber Tracts" atlas to visualise and learn about major white matter fiber tracts.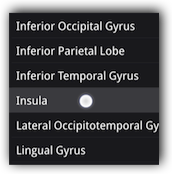
Selecting a Specific Brain Structure
After selecting an atlas, a list with all available structures belonging to that atlas will be shown. While tapping directly on a shown brain model is the most intuitive way to select brain regions, the brain structures list is another way to select a specific brain structure by its name (it is also the only way how different fiber tracts can be selected). Simply tap on the name of the desired area/tract to highlight it on the current brain mesh or on MRI slices in case that the head mesh is chosen.In order to obtain a detailed text description of a structure (brain region or fiber tract), tap on the name of a selected area shown in the right lower corner of the brain view. This will launch a popover dialog containing text information about the selected area or tract; for functional areas, the displayed text includes details about the conducted experiment that was conducted in the scanner to activate the respective specialised functional areaon.

Manipulating the Brain Hemisphere Models
You can select the left, right or both hemispheres brain mesh by tapping the "Left Hemi", "Right Hemi" or "Both Hemis" icon in the tab bar on the bottom of the brain visualization view. Use the head mesh to see brain structures on MRI slices (see below).To change the viewpoint do the following:
Rotation. To rotate the displayed brain model, simply touch in the brain visualization view and slide your finger up and down as well as left and right.
Translation. To move the displayed brain model, simply touch in the brain view with two fingers and slide your fingers in any direction.
Zoom. Use the usual pinch gesture to zoom in or out, i.e. put two fingers on the screen and move them apart (zoom in) or closer to each other (zoom out).
Slicing the Head Model
Tap the "Head" icon in the tab bar of the brain visualization view to switch to the head model. In this viewing mode, you may slice the brain revealing millimeter precise details from the high-resolution anatomical MRI scan. Any selected area is shown on revealed 2D brain slices using the same colors as used for the 3D models. Rotation, translation and zooming of the sliced head model operates in the same way as described above for the other 3D models. In head slicing mode, however, the top bar shows four additional icons that allow to slice the head model along three orthogonal directions.Slicing. Tap the "Slicing" icon (if not already selected). To slice in one direction, slide your finger in one direction (e.g. left or up). To slice in the opposite direction, slide your finger in the opposite direction (e.g. right or down).
Changing the slicing direction. Tap on one of the three head slicing icons in the top bar that symbolise from left to right the "Sagittal", "Axial" and "Coronal" slice planes. The head model will then be sliced as indicated by the selected icon. When sliding the finger in the brain view, slicing will now operate in the directions orthogonal to the slice plane (e.g. up/down, left/right, forward/backward).
Flip cut side. Note that a slice is shown as a cut, i.e. it reveals the slice on one side while the other side shows the head model. In order to reveal the slice on the other side of the cut, tap the currently selected head slicing icon a second time (currently not enabled).

Settings
Tap the "Settings" icon (see right) in the top bar to show the "Settings" dialog. Note that the "Settings" icon is only available when viewing the atlas list (in phone layout) or brain structures list (in tablet layout). The "Settings" dialog currently shows 1 setting option that influences the Android display mode.If you turn on the Full-Screen / Immersive Mode option (default: off), the program tries to use the whole screen space for Brain Tutor, i.e. standard system bars are hidden. In Android 4.4 (KitKat) or newer, this will enter the new "immersive" mode hiding all system navigation elements. You can temporarily bring system bars back by swiping from the top or bottom edge towards the centre of the screen. When launching the program at a later time, the previously chosen setting will be restored even if Brain Tutor 3D has been removed from working memory.
The last part of the "Settings" dialog shows the "About Brain Tutor 3D" section containing general information about the current version of the application.
