BrainVoyager v23.0
Graphical User Interface
After starting BrainVoyager, it presents its modern graphical user interface (GUI) to the user. It shows either its cross-platform dark interface (see snapshots below) or a platform-native interface reflecting the appearance of colors and controls as set by the operating system. The central part of BrainVoyager's main window contains the multi-document area - a workspace for multiple documents, each represented by a document window.
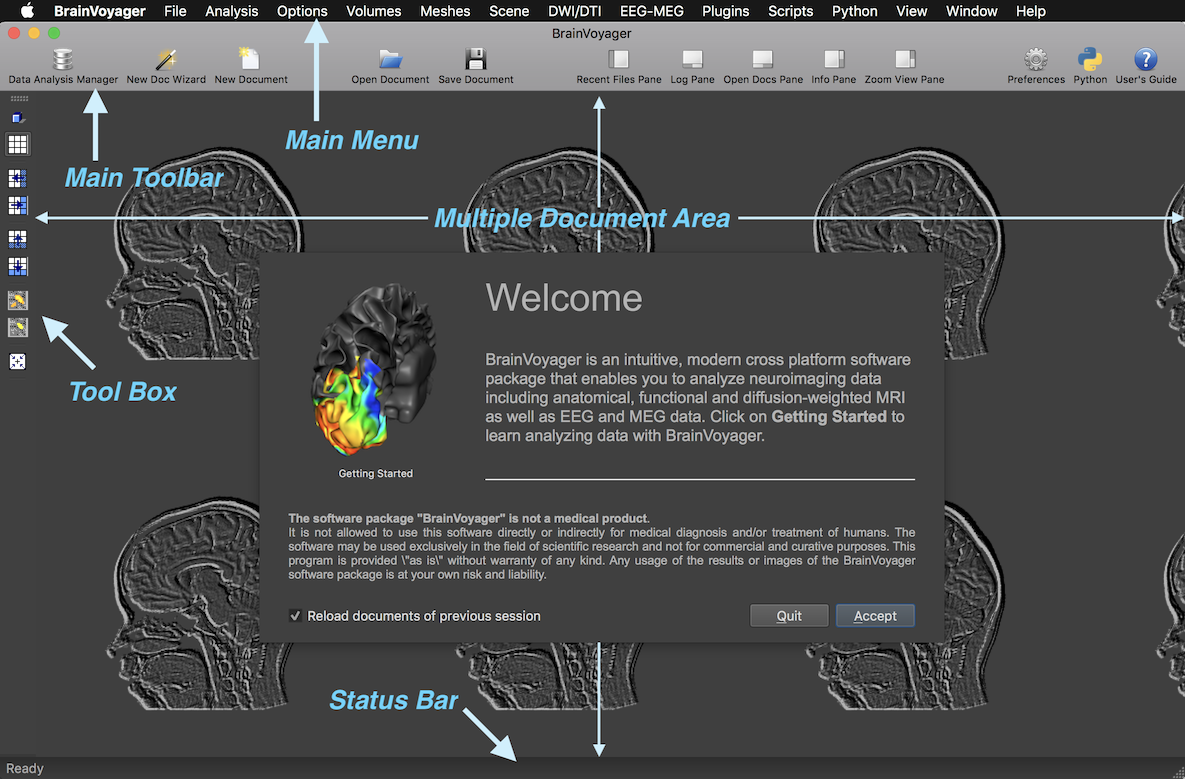
Document windows can be presented in tabbed mode (only one document visible at a time) or in tiled mode (multiple documents visible, see snapshots below). The main menu and main toolbar provide access to basic functionality usually by presenting a task-specific dialog when selecting an item in a menu or when clicking an icon in the main toolbar. Working with documents in the central workspace area is facilitated by toolbars and panes (see below) providing important functionality. Toolbars and panes can be hidden or visible in two states; if visible, toolbars and panes are docked to one of the sides of the main window but they can also be detached to "float" over or next to the main window. In the snapshot above, the Tool Box toolbar is attached to the left side of the main window, the Mesh Tool Box toolbar is attached to the right side while all panes are hidden. The state of toolbars and panes (position, size, visibility mode) is stored when closing the program and it is recovered when reopening the program.
Multi-Document Modes: Tabbed and Tiled
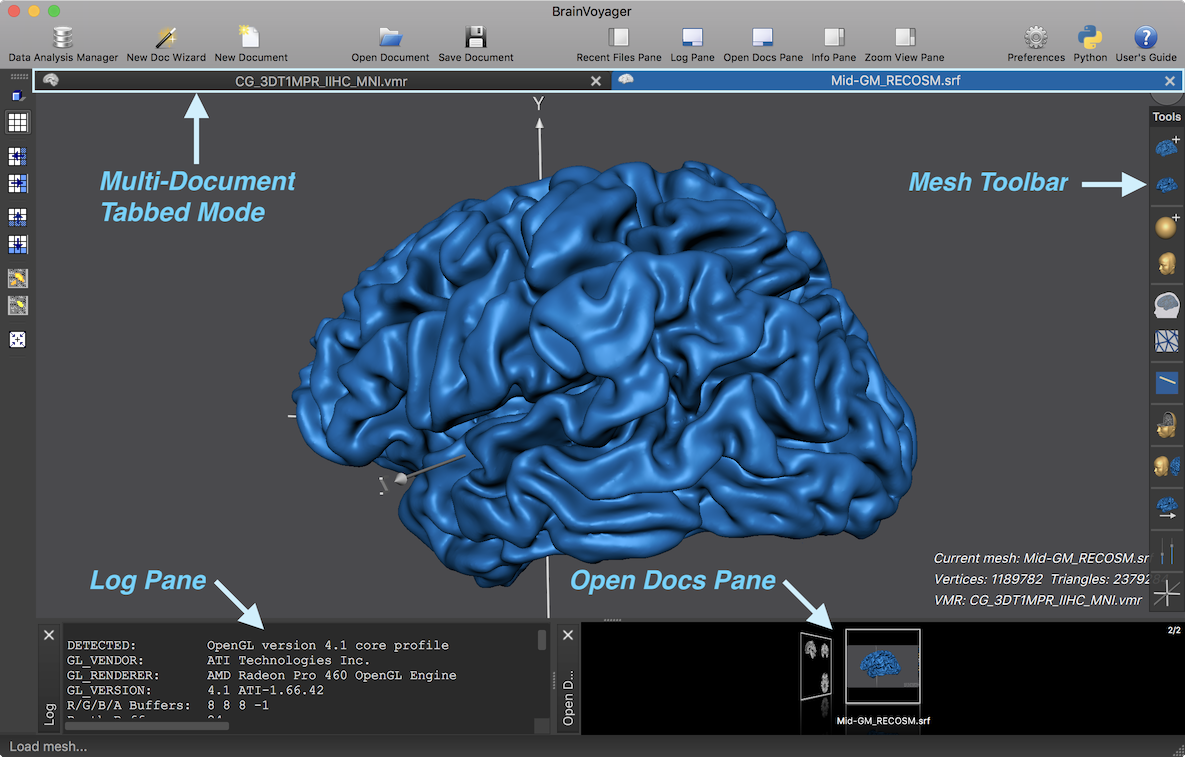
As default, BrainVoyager shows documents in tabbed mode, i.e. like in a modern web browser; clicking one of the displayed tabs will show the respective document window in the multi-document area while all other open document windows are hidden (see snapshot above). This view mode has the advantage that maximum screen space is available for the selected document, which becomes the current document. It is often useful to inspect multiple documents at the same time; for such situations, one can switch to tiled mode by selecting the Sub-Window View Mode command in the Window menu (and back to tabbed mode by selecting the Tabbed View Mode command). In sub-window mode, document windows can be resized and moved inside the multi-document area. The Tile command in the Window menu also switches to sub-window mode but it attempts to distribute document windows in a way that maximises their size without overlapping each other. The snapshot below shows two document windows side-by-side in tiled mode (an anatomical volume (VMR) document window and a mesh (SRF) document in a 3D viewer window overlapping the former one). A document can be made the current document by clicking the window's title bar or inside the document window.

The Document Context Menu
While major functions of BrainVoyager are accessible via the main menu, the main toolbar and keyboard shortcuts, document-specific functionality is also quickly accessible from a document's context menu, which can be easily invoked by right-clicking (also CTRL-clicking on macOS) the document's tab (in tabbed multi-doc mode) or title bar (in tiled multi-doc mode). The appearing document-specific context menu provides essential functions that are applicable to the type of document. The screenshot below shows the context menu for a 3D anatomical (VMR) document that allows calling e.g. the VMR Properties or Volumes-Of-Interest dialog. The context menu also let's one link 4D time course (VTC) data to the anatomical document with the Link VTC menu item, which subsequently allows to call statistical functions for the established VMR-VTC document, e.g. by selecting the Single-Run GLM menu item.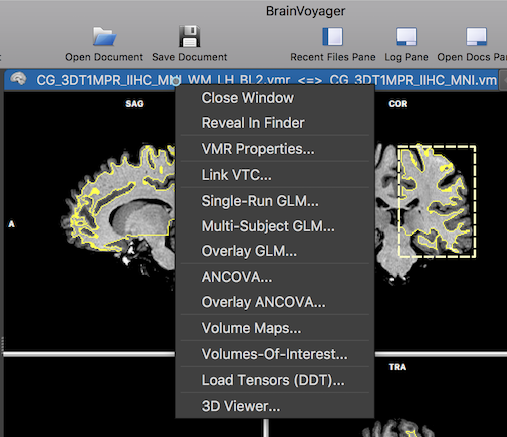
Note that for another document type, e.g. functional (FMR), diffusion-weighted (DMR) or mesh (SRF) documents, the context-menu will provide functions that are applicable tp these specific document types.
Important Tool Windows: Panes
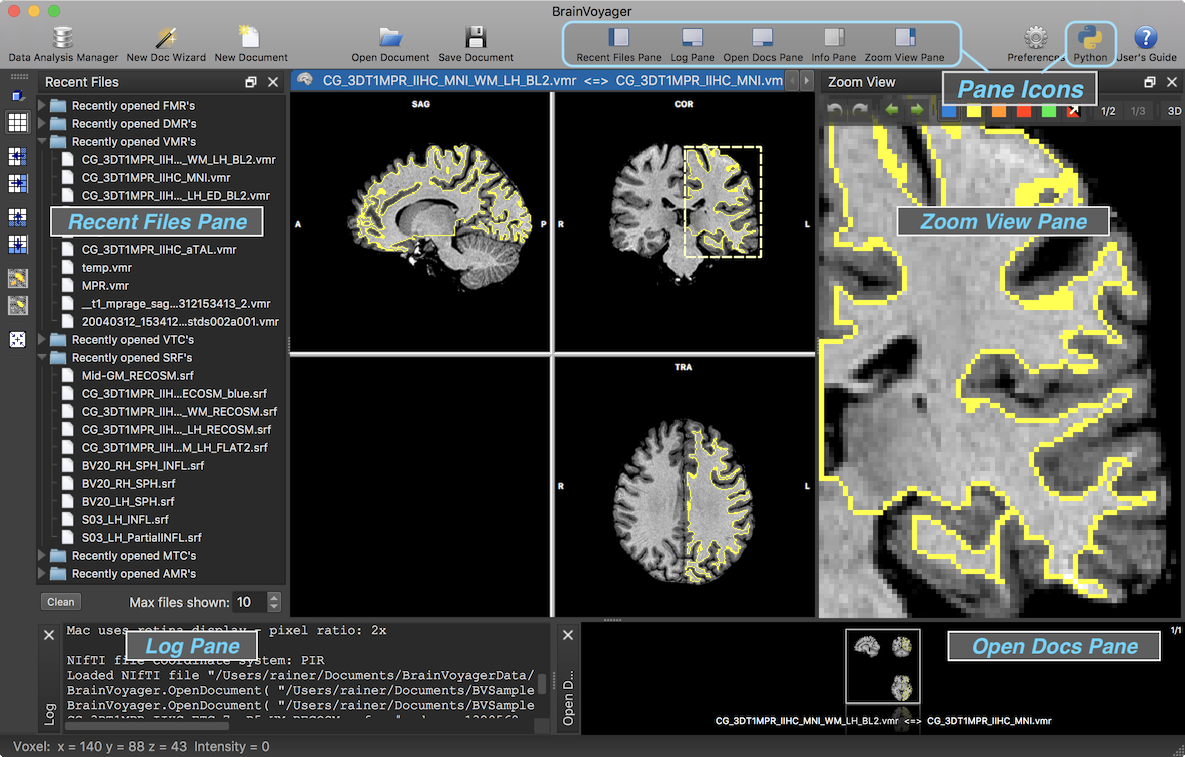
Besides toolbars, panes are important tool windows that are docked to a specific side of the main document window. They can also be undocked by clicking the pane undock icon to become separate windows that can be resized and moved freely. Double-clicking the title bar of a floating pane window will move it back to the previous dock position in the main window. It is also possible to move a floating dock window and drop it in another position (side) of the main window. The pane icons in the main toolbar (see snapshot below) or the items in the the View menu can be used to show or hide the various available panes. Note that the position, size and state (docked or floating, visible or hidden) of all panes is stored persistently and they are restored to the previous state when relaunching BrainVoyager.
The snapshot below shows 4 panes docked to the main window, the Recent Files pane on the left side, the Zoom View pane on the right side, thek Log pane at the bottom left side, and the Open Docs pane at the bottom right side. The following sections provide a short overview of all six available panes.
The Log pane
The Log pane shows important information during execution of various functions. It is recommended to keep this pane visible; when presenting important feedback, some functions and plugins may show the Log pane in case it is hidden.
The Recent Files pane
The Recent Files pane keeps a list of recently opened documents; clicking a document will open it and shows its document view window in the multi-document area of the main window.
The Open Docs pane
The Open Docs pane contains a visual representation of all documents currently available in the multi-document area in a "cover flow" layout. The Open Docs panel is especially useful when many documents are available since it allows to find a document using its visual representation. By moving the mouse pointer to the left and right while holding the left mouse button down is another means to quickly browse through available documents and to select a document by releasing the mouse when the desired document is shown in the central position. Furthermore, a context click (e.g. right mouse button or two-finger click on Mac OS X track pads or mice) on the central (current) document will display a context menu (like a context click on document tabs) that can be used to call relevant document-specific functionality.
The Zoom View pane
The Zoom View pane allows to present a zoomed view of any sub-region of a presented document. To select a sub-region, the ALT key needs to be pressed while the mouse pointer is positioned at the upper left corner; after pressing the left mouse button, the mouse button and the ALT key need to be pressed while dragging the mouse to the right lower corner of the desired sub-region. As soon as the mouse and ALT key are released, the selected sub-region will be displayed in the Zoom View pane. The selected sub-region will be highlighted by a stippled yellow rectangle in the document window (see snapshot above for an example view). Note that the yellow rectangle can be moved to a new location by clicking inside the rectangle and moving the mouse while holding down the ALT key. This is often quicker to move to a new location than re-selecting a new rectangle. In order to remove the selected rectangle clearing the Zoom View pane, a click outside the stippled rectangle while holding down the ALT key.
Note for Linux. Instead of the ALT key, the SHIFT+CTRL key combination need to be used for Zoom View functions since the ALT key may be assigned to perform system tasks (i.e. window movements on Ubuntu).
For VMR documents, the panel also allows to draw inside the volume using the zoomed section as a proxy to the data. For each open VMR document, the program also keeps a full drawing history allowing undo/redo operations for manual segmentation operations. Besides drawing pixel-by-pixel, region filling operations are also possible. These tools are especially useful for correcting errors of automatic segmentation procedures and detailed manual segmentations in the context of high-resolution (sub-millimeter) data. For more details see topic Manual Sementation Tools.
The Info pane
The Info pane shows helpful information during some functions, such as headers of DICOM files when creating projects and dynamic information about intensity and statistics values as well as ROI names under the mouse ponter (if the Info pane is hidden, the most important dynamic values under the mouse pointer are shown in the status bar).
The Python Console pane
The Python Console pane presents a Python interpreter that can be used to evaluate Python expressions including script functions. Note that any Python object created from Python scripts within a BrainVoyager session are available for use in the Python console. For more info about Python support in BrainVoyager, see topic "Python Scripting and Plugin Development".
Copyright © 2023 Rainer Goebel. All rights reserved.