BrainVoyager v23.0
Developing Qt QML/Quick User Interfaces
Since BrainVoyager 23.0 user interfaces for JavaScript scripts, GUI plugins and even Python scripts and plugins can be developed using a single modern declarative approach. The user interface can be defined in the modern QML language that is used to declaratively describe the layout of "QtQuick" user interface elements such as push buttons and text fields. Tools to develop simple interfaces that are sufficient for most use cases are provided by BrainVoyager as described below. For more complex tasks we recommend to use more advanced tools offered by the Qt Framework. This powerful framework is used to develop the user interface (and other aspects) of BrainVoyager itself. The Qt Framework offers Qt Creator, a sophisticated cross-platform develoopment tool for C/C++ as well as QML / QtQuick user interfaces. You can access the online help to learn how to use the program to quickly create a QML dialog in code or with the help of a graphical designer tool that writes the QML code for you.
Since GUI interfaces for scripts and plugins are rather simple (as compared to a large program like BrainVoyager), we recommend to use the tools provided by BrainVoyager itself to develop QML / QtQuick user interfaces. The most important tool offered by BrainVoyager is the QML / JS Script Developoment Window described in the previous topic. The development window is rather simple as compared to Qt Creator but it is very easy to use since it focuses only on the task to build simple user interfaces such as dialogs together with JavaScript functions called by the user interface. To learn about the basics of QML and Qt Quick user interface building, we recommend to consult the Qt QML Book, at least the Introduction of Qt Quick. The following sections demonstrate how the development window can be used to create the user interface of the "ExampleGUIPlugin" GUI plugin. We recommend to change and run the code to learn how to adjust the user interface to your needs and to prepare for building your own user interfaces. If errors occur, useful information will be shown in the Console pane below the code editor section in the development window, usually including the number of the line where something went wrong.
Detailed documentation. An important aspect of user interfaces is that they can call into the BrainVoyager API and BrainVoyager C/C++ plugins. More information about the BrainVoyager API for scripting can be found in the Scripting Getting Started Guide and Scripting Reference Manual document that are available in the 'GettingStartedGuides' folder, which is located in the '[user]/Documents/BrainVoyager' directory. For developing user interfaces for plugins, please consult the C++ Plugin Developer Guide that can be launched using the C++ Plugin Developer Guide item in BrainVoyager's Help menu.
The "Example GUI Script" Dialog
In the following sections the code of a simple user interface, the 'Example GUI Script' dialog is discussed in order to get you started. The dialog's user interface elements (e.g., buttons) trigger actions that perform operations on VMR documents, including counting the number of voxels in a certain intensity range, inverting intensity values in a specified intensity range and an operation to undo performed intensity changes.
User interfaces may serve scripts and plugins
The GUI script uses QML to implement the dialog and JavaScript (JS) only to implement its functionality. There is a very similar code example called 'ExampleGUIPlugin.qml', that implements the dialog as the frontend of a C/C++ "GUI Example" plugin, that can be launched from BrainVoyager's Plugins menu. The major difference of the two similar dialog files is that the actions triggered by the GUI Script dialog are handled by JavaScript code within the same (single) file, while in the GUI Plugin dialog, the time-consuming operations are handed over to the plugin C/C++ code. How this is done is described in the C++ Plugin Developer Guide. Of course the C/C++ plugin code is substantially faster in performing the respective functions, which require running loops over millions of voxels (see below). Comparing the compute performance of the GUI plugin with that of the GUI script makes clear that simple functionality and batch processing calling into BrainVoyager functionality can and should be done via GUI scripts while compute-intensive operations such as working over all voxels of a volume are handled more efficiently by C/C++ code as part of a GUI plugin.
The dialog's QML file ("ExampleGUIScript.qml") is directly availalbe in the Files pane of the QML / JS Script Developoment window (see red arrow in the screenshot below) after installation of BrainVoyager (version 23.0 or later). The developer window can be opened simply by pressing CTRL-J (CMD-J on macOS) on the keyboard or by clicking the Edit and Run Scripts item in the Scripts menu of BrainVoyager.
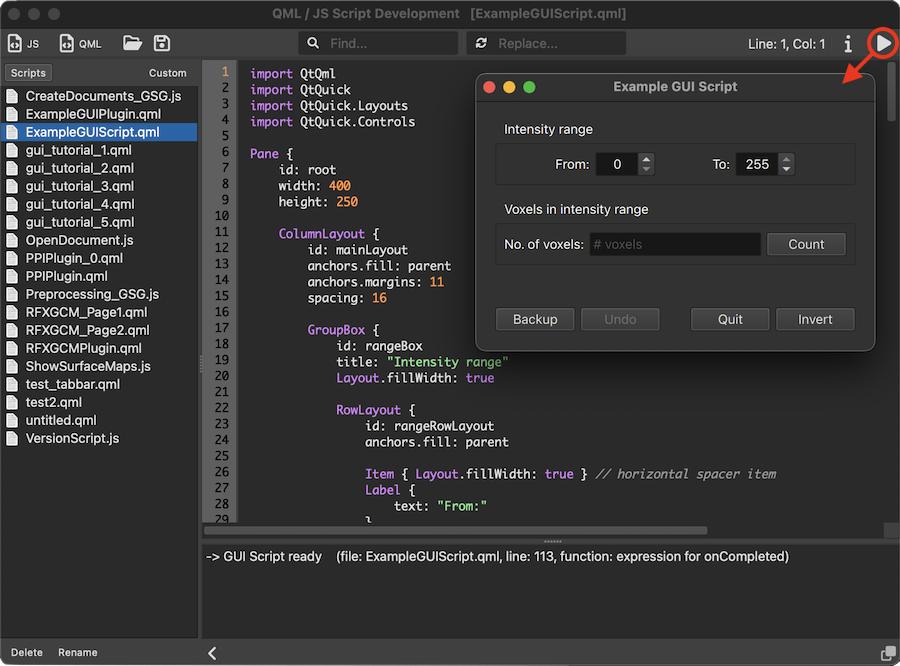
The figure above shows the finished "Example GUI Script" dialog on top of its source code in the QML / JS Script Development window. The dialog is created and shown to the user by clicking the Run icon in the right upper corner (or simply by pressing CTRL-R (CMD-R on macOS) on the keyboard. The ExampleGUIPlugin.qml file has been opened in the Code Editor by clicking the respective name in the Files pane on the left. It is recommended to study the simple 'gui_tutorial_[n].qml' QML files that are listed below the 'ExampleGUIPlugin.qml' file to learn with a series of simple examples how to build an increasingly complex dialog starting from a "Hello World" dialog. Note that in the screenshot above, the developer window is visible while running the code that displays the user interface. It is possilbe to hide the developer window when running the code by using the Hide Window While Running Script toggle in the Window menu of the QML / JS Script Development window.
After standard imports for QML and QtQuick modules at the begin of the file, the user interface declaration for a GUI script starts with a Pane type as the root element. This is strongly recommended as the root (instead of e.g. a Rectangle type or the generic Item type from which most types are derived) since a 'Pane' element will render the dialog background (and its interface elements) in the same appearance that is currently specified in BrainVoyager (dark or light theme, generic BrainVoyager or OS-specific style). The Pane element is made accessible as the "root" element everywhere in the code by specifying the name "root" for its 'id' property.
Specific user interface elements like buttons, text fields and spin boxess need to be placed in layouts. One way to do this is to use Qt Quick Layouts such as 'ColumnLayout', 'RowLayout' and 'GridLayout' elements. We highly recommend these layouts (as opposed to the alternative 'anchors' approach) because they support a convenient way to build flexible and resizable user interfaces. Layouts are stacked hierarchically by using curly braces (visible also as indentation) to definine parent-child relationships. The first layout specified is a ColumnLayout with an id named "mainLayout". This top-level layout will contain the major (3) horizontally layouted sections of the dialog:
- The Intensity range section that contains a From and a To spin box allowing the user to enter intensity values.
- The Voxels in intensity range section that will contain the counted number of voxels in the intensity range specified by the spin boxes in the intensity range section . The function to count the voxels is triggered by clicking the Count button. We will see how this action is able to call into the JS code in the same file that actually performs the counting operation.
- A third section at the bottom containing the push buttons Backup, Undo, Quit and Invert. Clicking the Invert button will call into JS code that inverts the intensity values in the specified intensity range; The Undo button can be used to undo the intensity inversion operation but only if the Backup button has been clicked, otherwise the Undo button is not available. The Quit button will close the dialog, which will also stop the script evaluation loop.
Note. The verson of the dialog for the GUI plugin does not have a 'Backup' button since the voxel intensity values of the current VMR are saved immediately when starting the plugin without user interactions; this happens in the C/C++ code so fast that the user will not notice any delay. In our GUI script version we could also backup the current VMR values immediately when launching the dialog but the backup operation takes several seconds in JS code and the user would likely think that something is wrong when the dialog would be 'frozen' (non-responsive). This is the reason why the GUI script dialog has an explicit 'Backup' button so that the user can press this button to save the VMR values and then knows that the operation might take some time.
The Intensity Range Section
The user interface elements of the intensity range section are placed in a RowLayout item. To provide a nice frame with a title, the row layout is embedded in a GroupBox item as indicated in the source code snippet below:
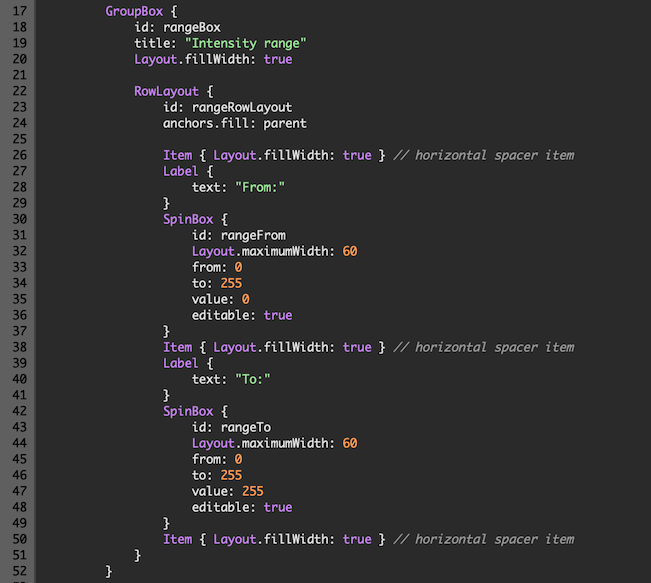
The group box provides a frame around the row layout and it shows the title "Intensity range" that is specified using the property 'title' of the GroupBox type (line 19). To support a resizable dialog, we also set the 'Layout.fillWidth' property to 'true' (line 20), which tells the group box to expand horizontally to cover all available space. If you resize the dialog, you will see this effect. The embedded row layout contains two SpinBox items, each preceded by a Label element. To center the labels and spin boxes, a "spacer" item is inserted at the begin (line 26) and end (line 50) of the items declared inside the row layout. The propoerty 'text' of the two Label elements is used to show "From:" and "To:" on the left side of the corresponding spin boxes. The id property of the spin boxes are specified (line 31 and 43) since we want to access their values from JavaScript code (see below). The (default) values of the spoin boxes are set using the 'value' property (lines 35 and 47); these values can be changed by the user as ensured by setting the 'editable' property to 'true' (lines 36 and 48), but the allowed values are restricted to the range [0 - 255] by using the 'from' (lines 33, 45) and 'to' (lines 34, 46) properties.
The Voxels In Intensity Range Section
As the first section, also the Voxels in intensity range section is created by placing user interface elements in a RowLayout item, which itself is placed in a GroupBox as shown in the code snippet below:
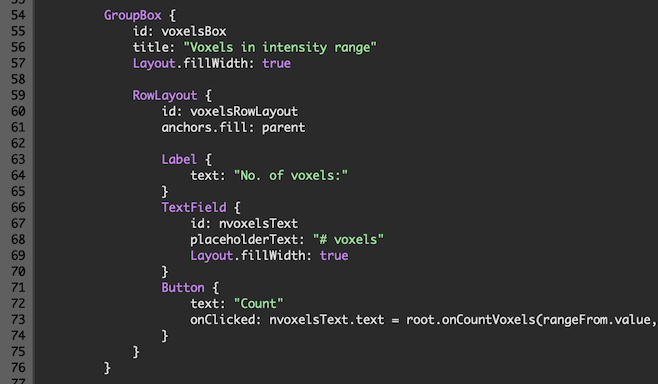
The row layout contains 3 user interface elements: a Label type with the text property "No. of voxels", a TextField, and a Button element. The text field receives an id ("nvoxelsText", line 67) since we want to set its text propoerty later to the calculated number of voxels, which will then replace the contents of the 'placeHolderText' property, which is set to '# voxels' (line 68), which is shown initially to the user. We also tell the text field to use up all available horizontal space by adding the 'Layout.fillWidth: true' code line. We use the 'text' property of the Button type to set its visible name on the button to "Count" (line 72). The 'onClicked:' property (line 73) is a special one since it specifies what action to perform in case the user clicks the button, which will trigger the 'clicked()' signal. The right side of a button's 'onClicked' property may contain JavaScript code that will be executed when the 'clicked()' signal is emitted. Here we call a JavaScript function with the name 'onCountVoxels()' that is defined at the level of the referenced 'root' (Pane) element (see below). The result of that function call, i.e. the number of counted voxels in the specified intensity range, is then shown in the Label element, which is accessed by its 'nvoxelsText' id allowing to set its 'text' property.
The Bottom Button Section
The last section is located at the bottom dialog and contains a set of buttons as is often the case for dialogs:

The defined 'Backup' Button item calls the root item's 'onBackup()' script function (see below) in its 'onClicked() property (line 89). The 'Undo' button calls the root's 'onUndo()' function (line 95); note that this button is disabled initially, which is achieved by setting its 'enabled' property to 'false' (line 94). The 'Invert' button calls the root's JavaScript function 'onInvert()' (line 106). The 'Quit' button calls a function of the global BrainVoyager object (line 101), which is made available to any script automatically. Note that you can also write "bv" instead of "BrainVoyager" to call its functions. The called "CloseDialog" function will close the dialog and ends the evaluation of the script. Note that the dialog places the 'Backup' and 'Undo' button on the left side and the 'Quit' and 'Invert' buttons on the right side. This is achieved by placing a "spacer" item between the declaration of the 'Undo" and 'Quit' buttons in the 'buttonsRow' RowLayout item (line 97). There is another spacer item (line 79-81) that ensures that the space between the first two row layouts and the buttonsRow layout is filled as much as possible by the item's "Layout.fillHeight: true" code line.
Calling JavaScript Functions
The code of the 3 sections briefly described above completes the declarative part that defines the user interface elements and their layout. We have seen that the 'onClicked' properties of Button items may contain JavaScript code. Instead of writing a lto of code inside the 'onClicked' property itself, it is recommended to call JavaScript functions defined at the root level in order to separate the GUI declaration (frontend) from the procedural code (backend). The functions defined above in the 'onClicked' properties of buttons are, thus, all appearing at the level of the root ('Pane') element after the user interface declarative part. the first two JavaScript functios are shown in the code section below:
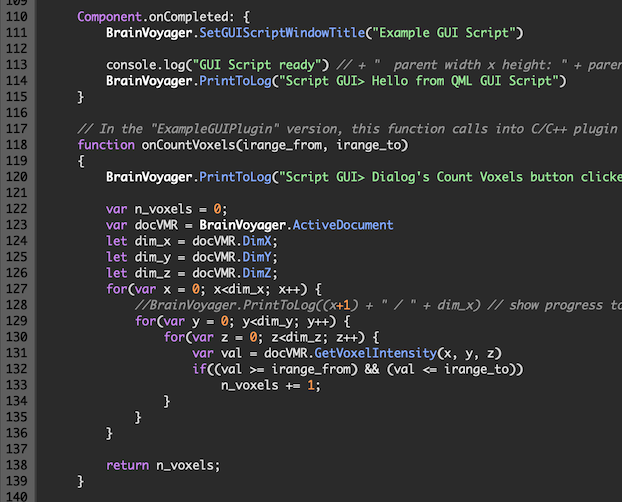
Actually the first function "onCompleted()' is optional and can be added to any item to do some initiialization work at the moment when the component (here the 'Pane' root item) has been fully created. The 'onCompleted()' function sends an information message to both the Console pane below the code editor (line 113) as well as to the standard BrainVoyager Log pane (line 114). After running the script, you will find the respective messages in the console and in the BV Log pane when the dialog appears on screen. The messages to the console are especially helpful for testing and debugging purposes, while messages to the Log pane should be informative for the BrainVoyager user. Before these calls, the JS function also calls the 'BrainVoyager' function 'SetGUIScriptWindowTitle()' (line 111), which changes the default name in the title bar of the displayed dialog to the provided text ("Example GUI Script"). Without this call, the dialog would show the name of its .qml file (here: "ExampleGUIScript.qml").
The next JavaScript function is 'onCountVoxels()' (lines 118-139) that is called in the 'onClicked' property ("signal handler") of the Count button. The function receives two parameters, 'range_from' and 'range_to', that are retrieved from the two SpinBox elements in the first section. The full line of code in the definition of the Count button is:
onClicked: nvoxelsText.text = root.onCountVoxels(rangeFrom.value, rangeTo.value)Here we see that the two input parameters of the called 'onCountVoxels()' JaveScript function get their values from the 'value' property of the two spin boxes that are accessed with their id's 'rangeFrom' and 'rangeTo'. The code inside the 'onCountVoxels()' JS function starts with sending a message to the BV Log pane (line 120). The next code lines (113-119) illustrate how the JavaScript code can loop over all voxels of a VMR document accessing their intensity values. The first code line sets the variable 'n_voxels' to 0 (line 122), which will be incremented in the subsequent nested loops. The next line retrieves the current VMR document from BrainVoyager's workspace and assigns it to the variable 'docVMR' (line 123). The next 3 lines access the x, y, and z dimensions of the VMR document; this is not really necessary, but it slightly optimizes the code in the loops following next. If the specified intensity range in the spin boxes include the full range of a VMR volume (0 - 255), one could simply return as the number of voxels the product of the three dimensions (this is left as an exercise for the reader). We want, however, a more general functionality that counts the voxels in a restricted intensity range provided by the user. This is accomplished in the inner loop by accessing the intensity value of a voxel using the documents 'GetVoxelIntensity()' function (line 158) providing a voxel's x, y and z coordinate as input. The retrieved intensity value is assigned to the variable 'val' which is then used in the next line to check whether this voxel's value falls within the specified intensity range - if this is the case, the 'n_voxels' variable is incremented accordingly. After the nested loops, the function finally returns the number of counted voxels (line 138), which is assigned to the 'text' property of the 'nvoxelsText' TextField as described above. Note that this update of the text property is immediately visible to the user who will see the result of the executed function. The next function, 'onInvert()' (see below) is called when the 'Invert' button iis clicked. The code of this function is very similar to the code of the 'onCountVoxels()' function.
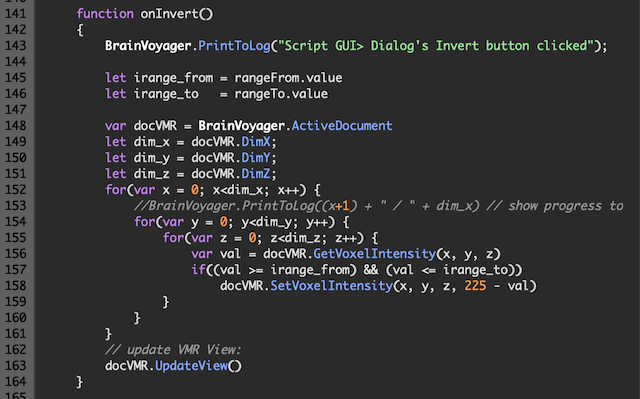
A difference is that the values of the 'rangeFrom' and 'rangeTo' spin boxes can also be accessed in the JavaScript code at the root level (lines 145 and 146) since items are available everywhere if they have a unique 'id' property name. In the loop only one code line is different than before (line 158), whiich uses the 'SetVoxelIntensity' function of the accessed BrainVoyager document object to invert the voxel intensity if the original value falls in the specified intensity range. This function takes four parameters, first the three voxel coordinates and thene the new inensity value, which is calculated by subtracting the original value from the value 225. Note that this value is not 255 because intensity values only use the 0 - 225 range in VMR documents, the values between 226 - 255 are used for some (usually old) functionality representing color values. After the loop the 'UpdateView()' function of the document object is called, which refreshes the VMR View, i.e., the (tabbed) window in the workspace showing the 3 orthographic slice views of the accessed VMR. Without this call the user would only see the made changes to the VMR if the BrainVoyager window would be updated, e.g., by resizing it.
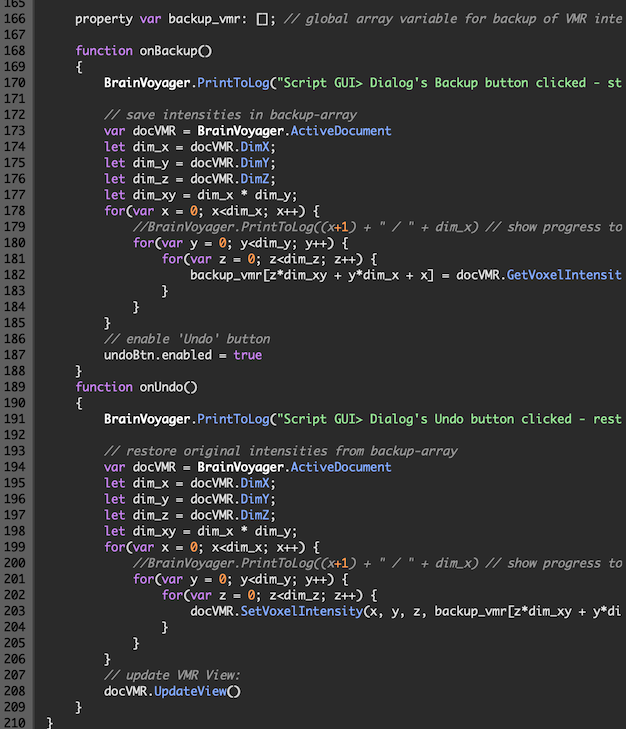
The last two JS functions implement the "undo" operation restoring the original VMR intensity values fi they have been backuped (after closing the dialog, one can also restore the original values using the standard 'Reload VMR' operation). To backup the intensity values of the current VMR, the intensity values are stored in a JavaScript array with the name 'backup_vmr'. (line 166). This arrayy variable is defined as a property of the root ('Pane') item and thus available for the lifetime of the dialog. In the 'onBackup()' JS function we loop over all voxels and fill the array (line 182). Since we use a 1-dimensional array, we assign a unique array index by using the 'z*dim_xy + y*dim_x + x' expression; alternatively we could increment a counter (e.g., 'idx') and fill the array with the expression 'backup_vmr[idx] = docVMR.GetVoxelIntensity(x, y, z)'. After the loop, the 'enabled' property of the 'Undo' Button item is enabled since we now have a backup of the intensity values. After inverting the intensity using the 'Invert' button, we can now click the 'Undo' button to reset the VMR doc's intensity values to the stored ones. The same nested loop is used as before but the assignment is inverted, i.e., we use the 'SetVoxelIntensity()' function of the VMR document object and use the voxel values stored in the 'backup_vmr' array in the 4th parameter. After the loop the 'UpdateView()' document function is called so that the intensity changes are made visible to the user.
Copyright © 2023 Rainer Goebel. All rights reserved.